The Admin settings page allows you to configure your restaurant details, address, staff details, printers and so on. Right from your bank details to hours of operations.
For simplicity purpose, the Admin settings page has been separated module-wise, each containing settings pertaining to itself.
Restaurant
Restaurant section is basically divided into 3 parts i.e. Quick Setup, Business Details & Hours of operation.
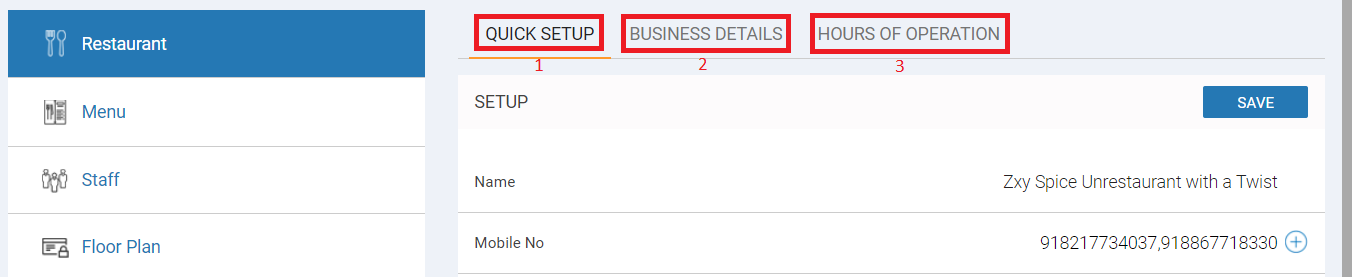
Quick Setup
This section allows you to edit details like restaurant name, mobile number, home delivery settings, table reservation settings & so on.
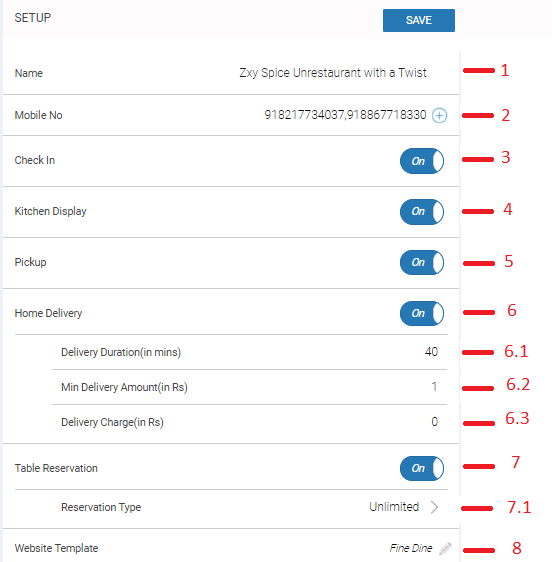
1. Name: Allows you to edit your restaurant name at any moment.
2. Mobile Number: Allows you to add edit or add mobile number of the restaurant. Click on the ![]() icon to add a number.
icon to add a number.
3. Check In: Check in switch allows you to decided whether or not you want to enable check in functionality for your restaurant.
4. Kitchen Display: Kitchen Display switch allows you to decided whether or not you want to enable kitchen display functionality for your restaurant.
5. Pick up: Pick up switch allows you to decided whether or not you want to enable pick up functionality for your restaurant.
6. Home Delivery: Home Delivery switch allows you to decided whether or not you want to enable home delivery functionality for your restaurant. If yes then enter delivery duration, min delivery amount and delivery charges.
6.1 Delivery Duration(in mins): Allows you to enter standard delivery time for your restaurant.
6.2 Min Delivery Amount(in Rs): Allows you to enter minimum delivery amount above which delivery is provided by your restaurant.
6.3 Delivery Charge(in Rs): Enter if any delivery charges are applicable for home deliveries
7. Table Reservation: Table reservation switch allows you to decided whether or not you want to enable table reservation functionality for your restaurant. If yes then select the reservation type.
7.1 Reservation Type: Allows you to select type of reservation customer can do in your restaurant i.e. unlimited, by capacity or by table.
Business Details
For easy understanding of business details section it is further divide into General Information, For Food Order & For Table Reservation.
General Information
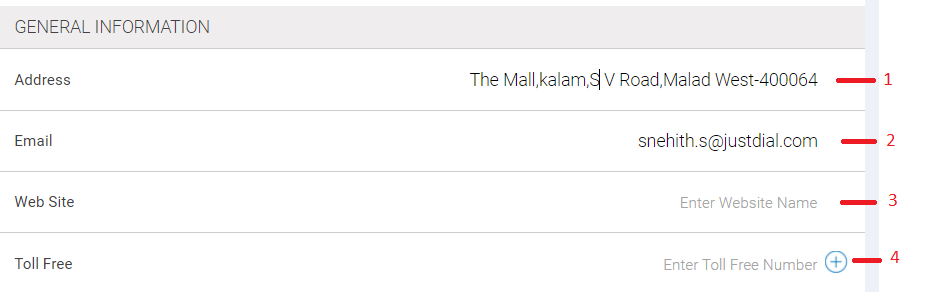
1. Address: Allows you to add/edit address of your restaurant. Same address will be displayed on your website.
2. Email: Allows you to add/edit email address of your restaurant.
3. Web Site: Allows you to add/edit name of your website.
4.Toll Free: Allows you to add/edit toll free of your restaurant. To add a new number, click on ![]() icon.
icon.
For Food Order

1. Order Confirmation Mobile Number: Allows you to add/edit mobile on which you will receive a message of order confirmation. To add new number click on ![]() icon.
icon.
2. Order Confirmation Email ID: Allows you to add/edit email ID on which you will receive a mail of order confirmation. To add a new number, click on ![]() icon.
icon.
3. Order Tracking Mobile Number: Allows you to add/edit order tracking mobile number of your restaurant. To add a new number, click on ![]() icon.
icon.
4. Order Tracking Landline Number: Allows you to add/edit order tracking landline number of your restaurant. To add a new number, click on ![]() icon.
icon.
For Table Reservation
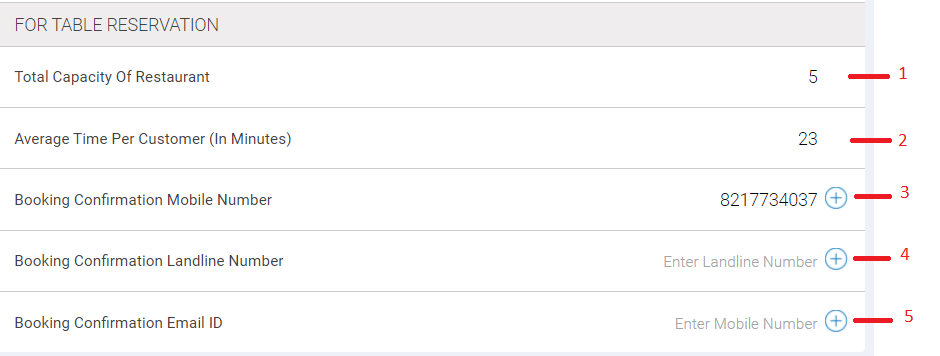
1. Total Capacity of Restaurant: Allows you to add/edit total number of tables for reservation.
2. Average Time Per Customer(In Minutes): Allows you to set average time in minutes for which table will be booked, then it will available for booking again.
3. Booking Confirmation Mobile Number: Allows you to add/edit mobile number on which you will receive a message of booking confirmation. To add new number, click on ![]() icon.
icon.
4. Booking Confirmation Landline number: Allows you to add/edit landline number on which you will receive a cal for booking confirmation. To add a new number, click on ![]() icon.
icon.
5. Booking Confirmation Email ID: Allows you to add/edit email address on which you will receive a mail of booking confirmation. To add new a email address, click on ![]() icon.
icon.
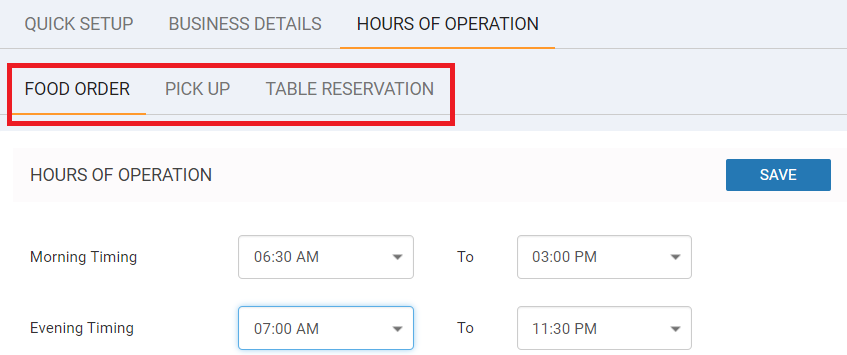
Hours of operation
Hours of operation allows you to add/edit working days, morning timings and evening timings of the restaurant. Additionally you can also customise timings of ordering food, pick up and table reservations.
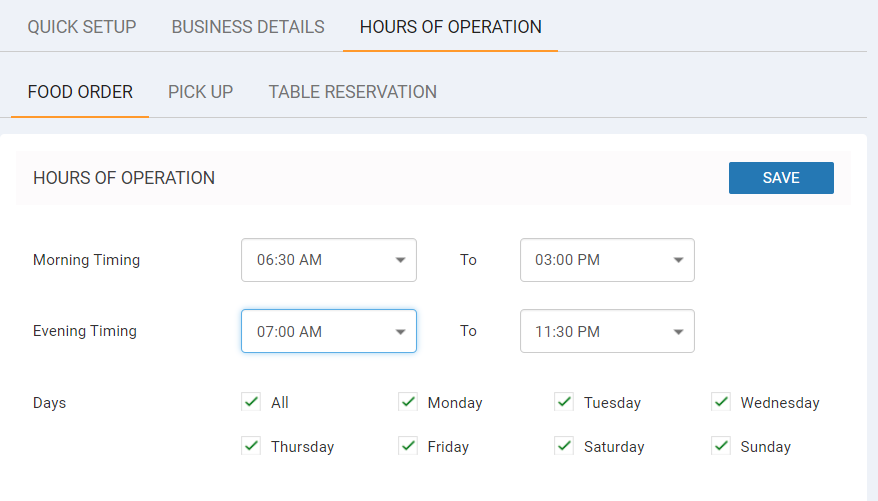
Click on the timings field and from the drop down select the morning and evening timings of your restaurant. To select working days of your restaurant, tick on the checkbox against that day.
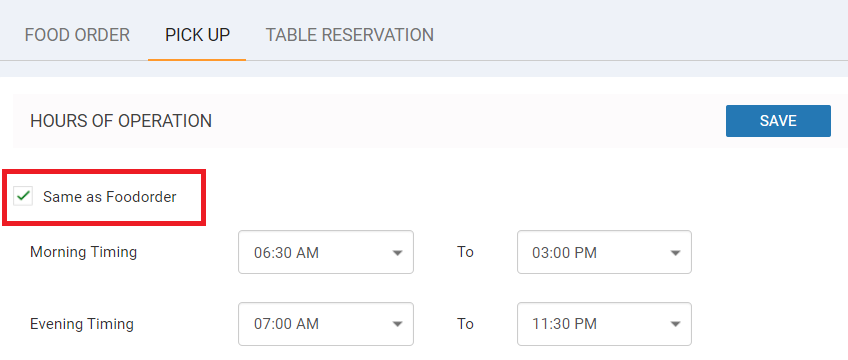
Similarly you can set timings and working days for Pick Up and Table Reservations.
NOTE
In case you wish add same working days and timings for Pick Up and Table Reservations sections, click on the Same as Foodorder checkbox.
Once done with required changes click on Save button to save all the changes made and proceed.
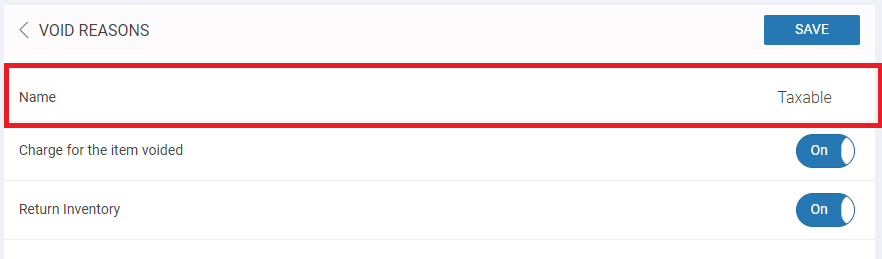
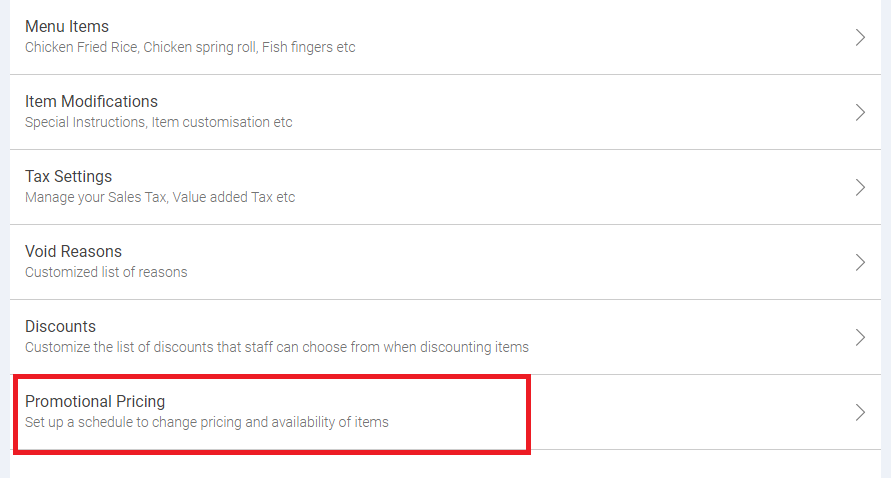
Menu
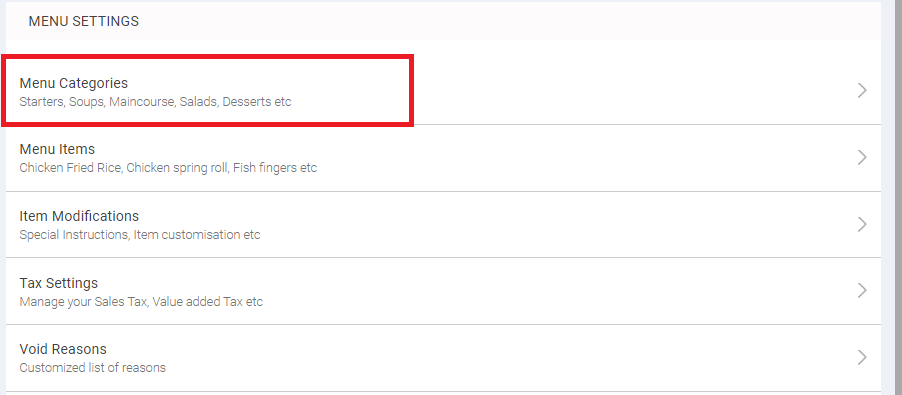
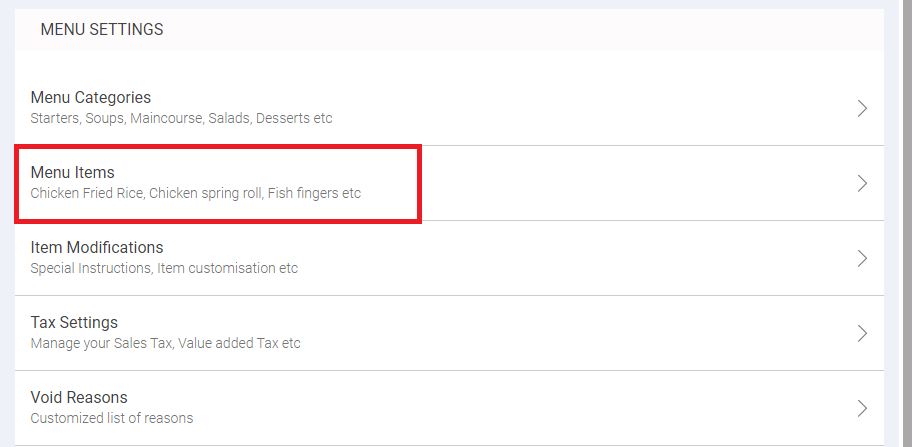
Menu section allows you to add/edit menu categories, menu items add modifiers, taxes, discounts & promotional pricing. For better understanding the menu section it has been divided in to 7 categories.
1. Menu Categories
2. Menu Items
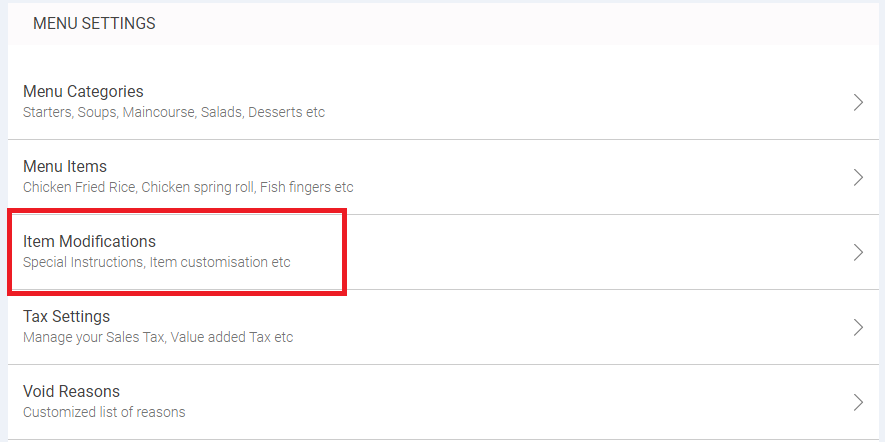
3. Item Modifications
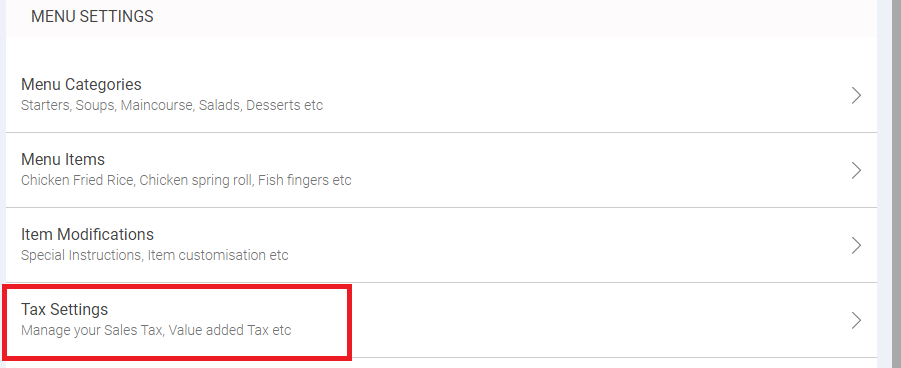
4. Tax Settings
5. Void Reasons
6. Discounts
7. Promotional Pricing
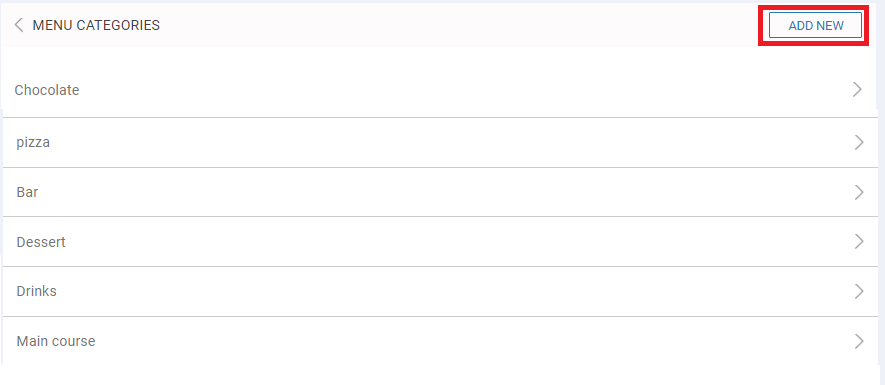
1. Menu Categories
Menu categories section allows you to add/edit/delete menu categories. You can also set printer, taxes, icon and visibility of that menu.
To add a new menu category follow below mentioned steps.
Step 1.
Click on Menu categories.
It will display list of all categories present in the list.

Step 2.
To add a new category click on the ADD NEW button.
Step 3.
Next in the MENU CATEGORY SETTINGS section enter name and select default printer, taxes and icon of that category.
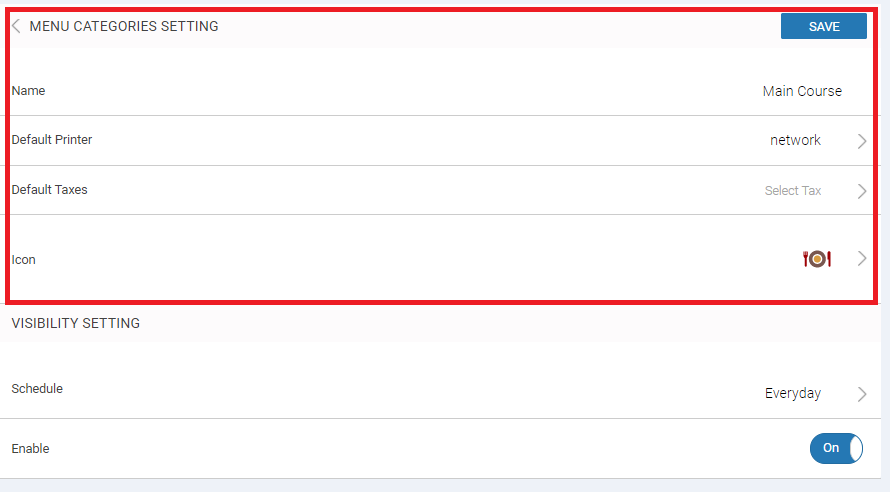
Step 4.
Select the schedule of the menu category i.e. it will display on which day and time that menu category should be available.
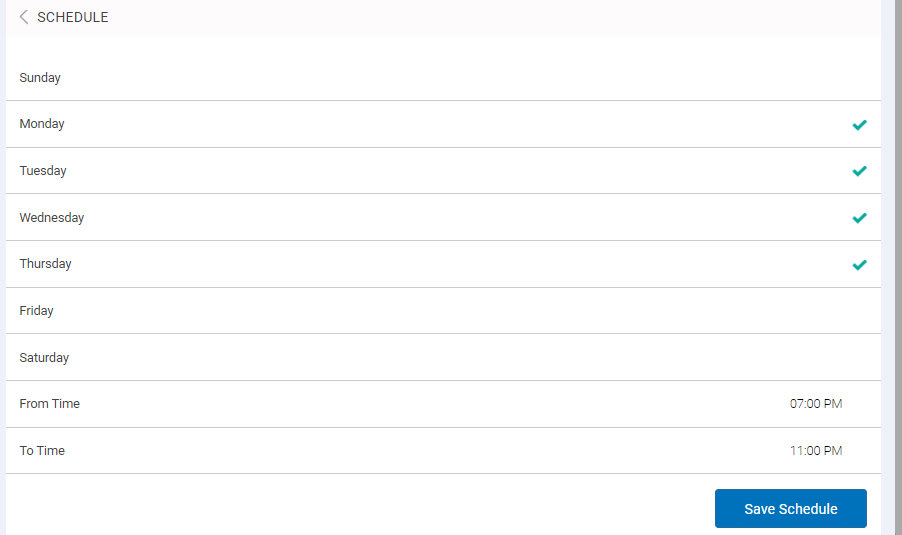
Step 5.
Once done click on Save Schedule.
Similarly you can edit the present menu categories and save the changes.
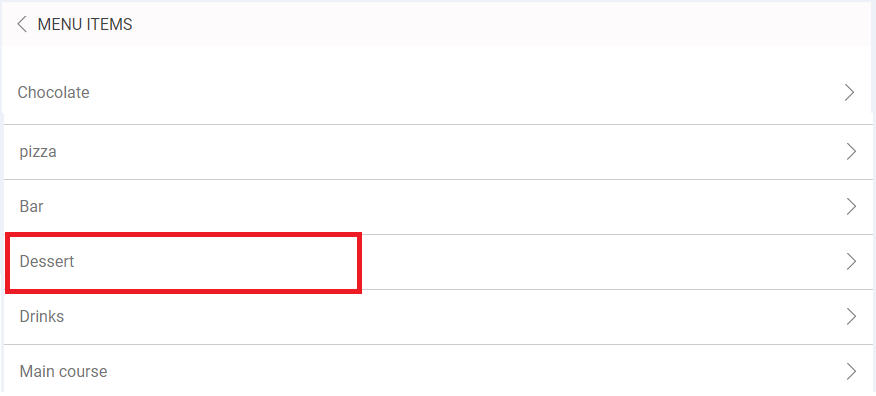
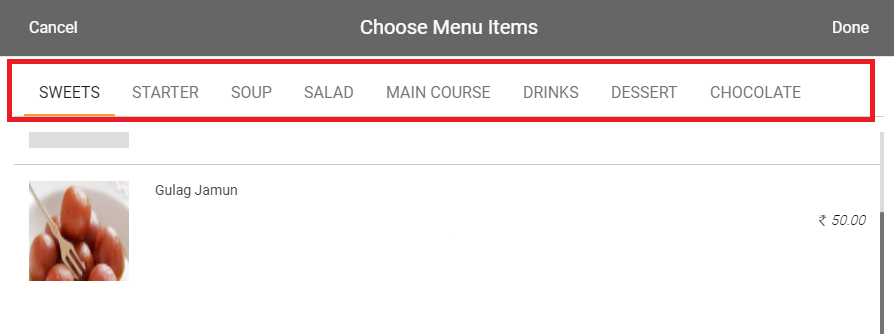
2. Menu Items
Menu items section allows you to add/ edit items to the menu category. Additionally you can also add/edit images, prices, taxes, modifier and decide if that item is deliverable or not.
To add a new item follow below mentioned steps.
Step 1.
Click on Menu items.
Step 2.
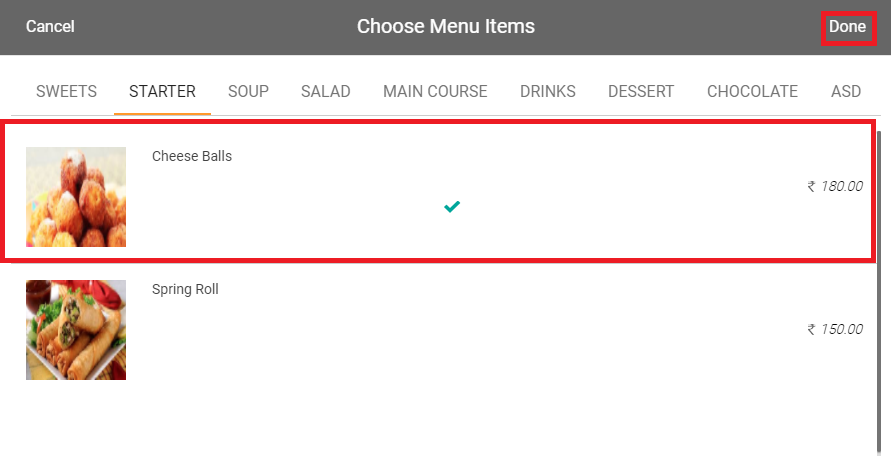
Next it will display list of all menu categories. Click on the menu category you wish to add item into.
Step 3.
It will display list of all present items. To add new click on ADD NEW button.
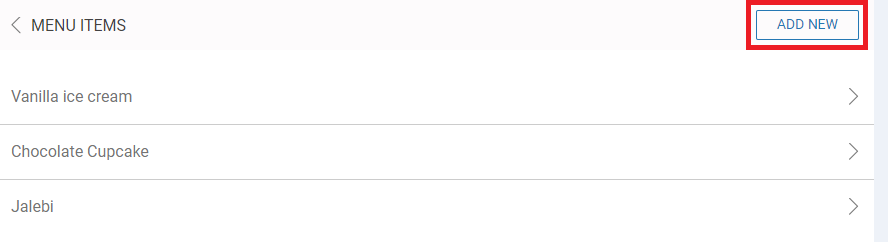
Step 4.
Clicking on ADD NEW button opens up following item detail page.

1. Name: Enter the name of item.
2. Cost: Enter cost per item.
3. Inventory: Inventory section allows you to add product to inventory and set warning limit when inventory reaches specific count. To do so, click on inventory turn on the switches of Manage Inventory & Warn When Inventory Reaches and enter the quantity.
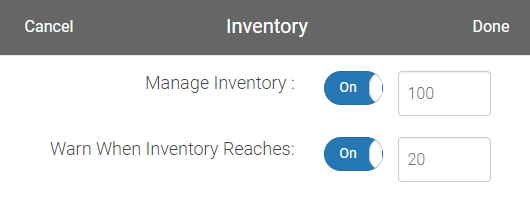
Once done click Done to save inventory.
4. Notes: Enter note if required.
5. Description: Enter in detail description of the item.
6. Image: Allows you to add image directly from your computer or laptop. Click on the image and browse for the image.
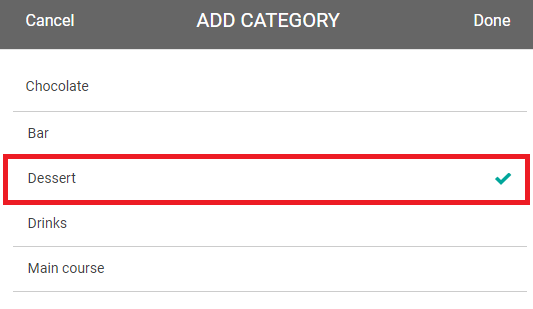
7. Menu Category: Click on the category section and select the category under which item will come. Click Done to save the category.
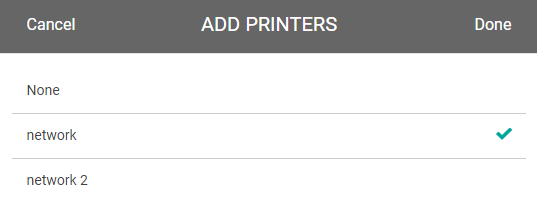
8. Printer: Click on the Printer settings option and select the printer you wish to get the that item billed from. Click Done to save the printer.
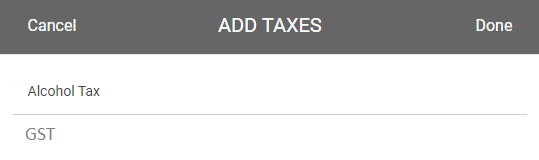
9. Taxes: Click on the tax option and select the tax you wish to apply on that item. Click Done to save the taxes.
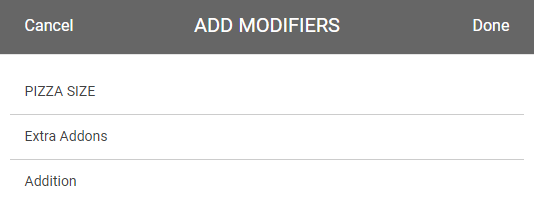
10. Modifier: Click on the modifier option and select the modifier you wish to apply on that item. Click Done to save the modifier.
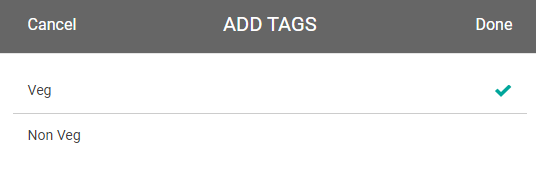
11. Veg/Nonveg: Click on the Veg/Nonveg option and select the type of that item. Click Done to save the changes.
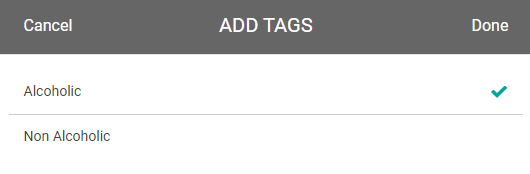
12. Alcoholic/Non-Alcoholic: Click on the Alcoholic/Non-Alcoholic option and select the type of that item. Click Done to save the changes.
13. Delivery: Decide whether you want allow this item for home delivery or not.
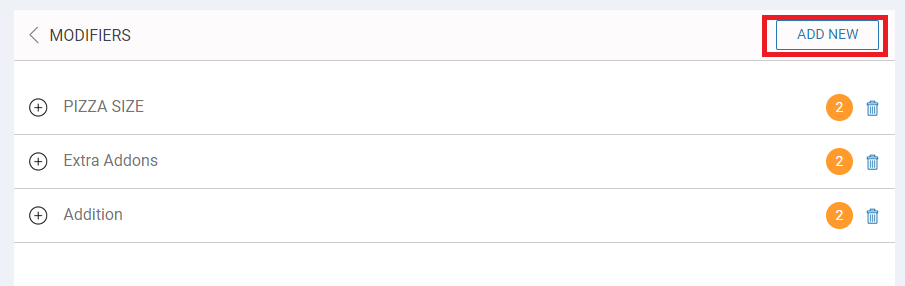
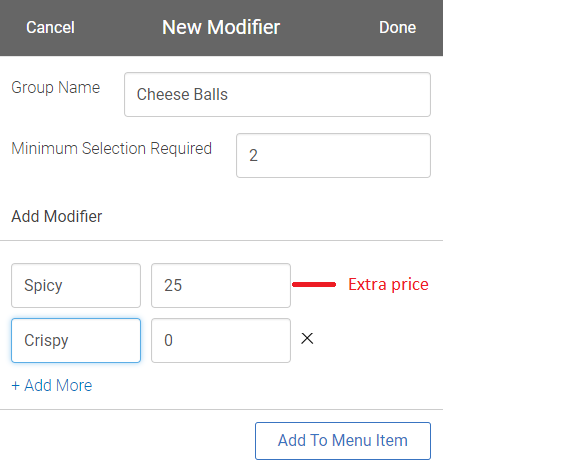
3. Item Modifications
This section allows you to add or customise any items in your menu. You can also add multiple modifiers for one item. To add new modifier follow below mentioned steps.
Step 1.
Click on Item Modifications.
Step 2.
A list of all modifiers will be displayed here. To add a modifier click on ADD NEW option.
Step 3.
In the next screen that opens up enter the group name, add number of modifiers, enter title of the modifier and prices applicable for that modifier.
Step 4.
Click on Add to Menu Item to add this modifier to the item.
Step 5.
Select category of the item.
Step 6.
Select the item and click on Done option to save.
Once the modifier is added it will be reflected while taking an order.
Similarly you can edit any added modifier.
In case you wish to delete any modifier click on the ![]() icon.
icon.
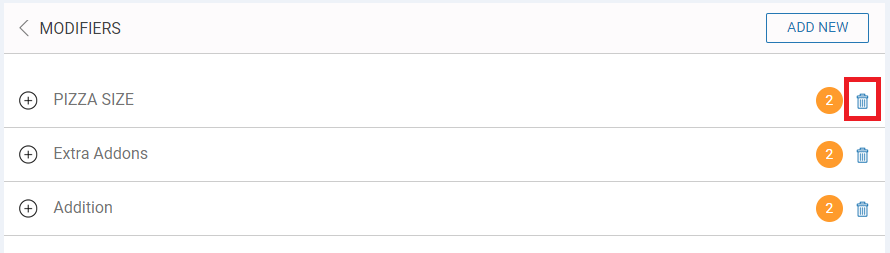
Click OK to proceed.
4. Taxes
Tax section allows you add new taxes, decide whether taxes are inclusive or exclusive of bill, add packing charges and any goods & service tax.
To add a new tax follow below mentioned steps.
Step 1.
Click on Tax Settings.
Step 2.
Click on ADD NEW.
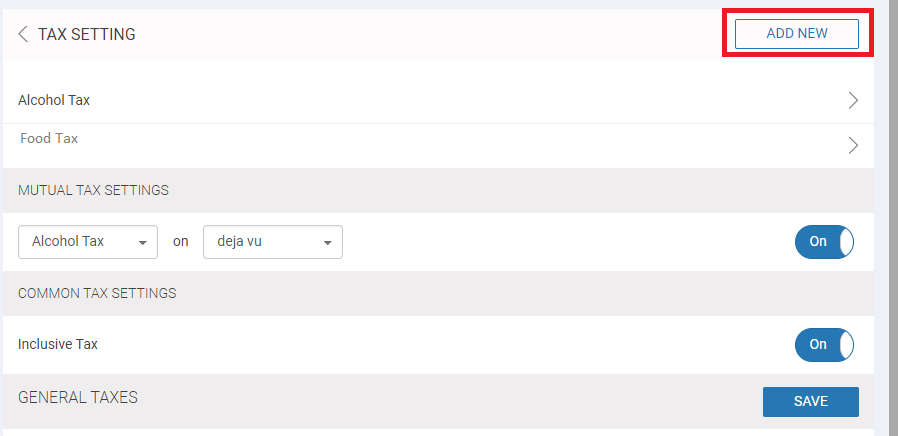
Step 3.
Enter all details to add a tax.
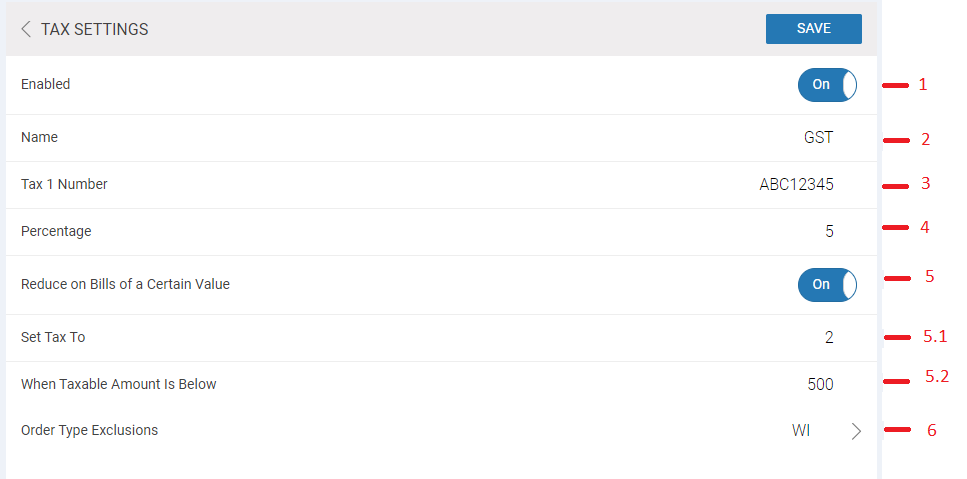
1. Allows you to decide whether you want to enable or disable the tax.
2. Enter name of the tax.
3. Enter number of the tax.
4. Enter percentage to be applicable on the bill.
5. Allows you to decide whether you wish to reduce tax above certain value. If yes the following 2 options will appear.
5.1 Enter reduced tax amount.
5.2 Enter amount below which taxes should be applicable.
6. Decide on which type of order the tax should be applicable. i.e Walk In, Home Delivery & Pick up.
Once done click on Save to proceed.
Step 4.
In case you wish to add mutual tax, select the taxes from the drop down and turn on the switch.

Step 5.
Decide whether the tax is inclusive or exclusive of bill. Turn on or off the switch as per your requirement.

Step 6.
Enter the packing charges in rupees.

Step 7.
Enter the Goods & Service tax in percentages.

Step 8.
Click on Save button to save the packing and goods taxes.

5. Void Reasons
Void reasons sections allows set charger for void items and whether it can be returned back to inventory.
Definition of void reasons - For example, an alcoholic drink is served but the drink was not requested by the customer. The waiter voids it and the drink is poured down the sink. The customer walks away without being billed in any way for the drink. However, the tax authority still requires the business owner to pay a tax on a drink decanted. You can ensue such tax compliance by enabling Is Taxable. If this is enabled, no tax will appear on the Order screen. However, the Void report will indicate which voided items are taxable and the amount that was voided. You can use the Void report to calculate taxes that must be remitted for voided items.
To create a new reason follow the below mentioned steps.
Step 1.
Click on Void Reasons.
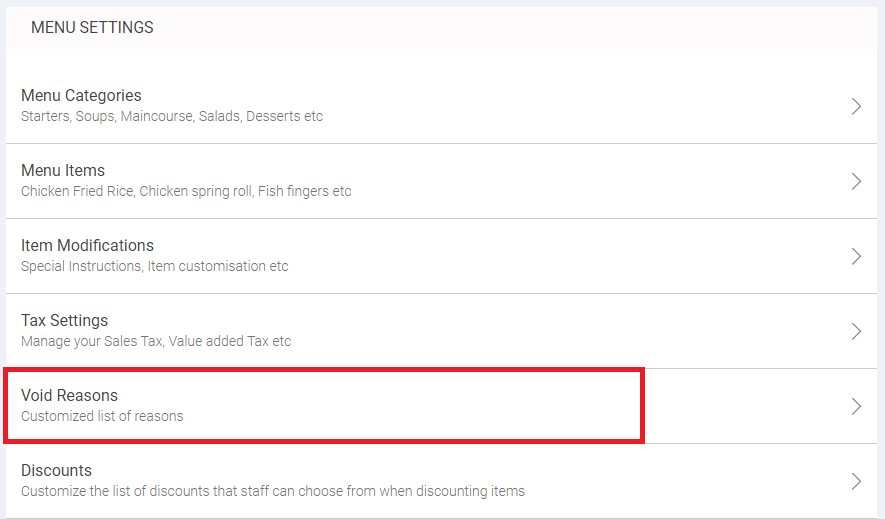
Step 2.
A list of void reasons will be displayed here. Click on ADD NEW.

Step 3.
Enter the name of reasons.
Step 4.
Decide whether charge for the item voided and return back to the inventory.
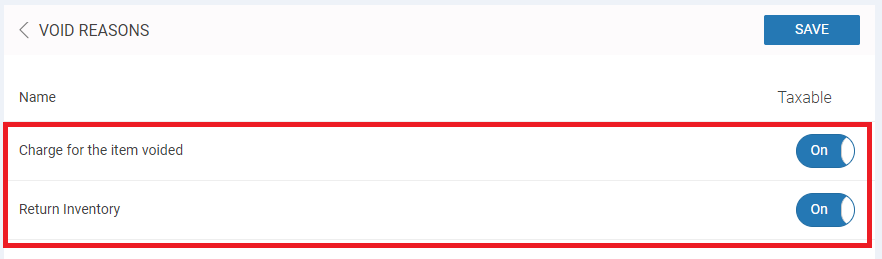
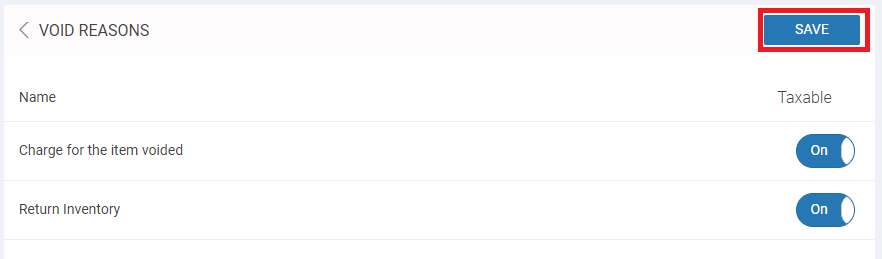
Step 5.
Click Save to proceed with the changes.
Similarly you can also edit reasons and save the changes.
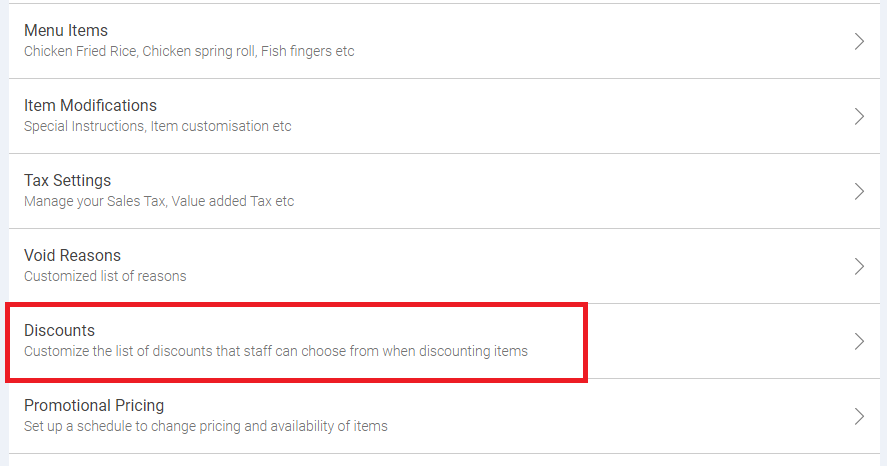
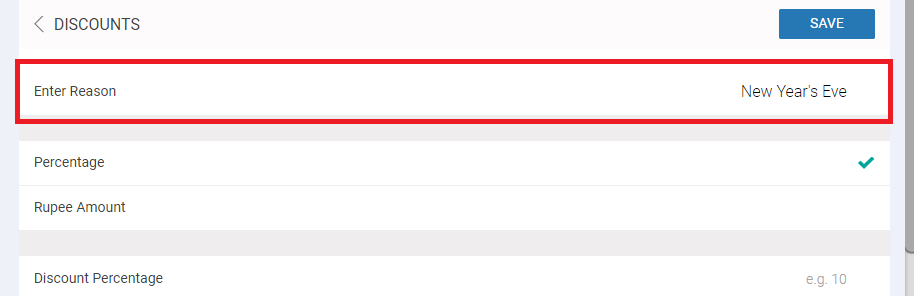
6. Discounts
This section allows you to add discounts on your orders. You can select discount percentage wise as well as in rupees.
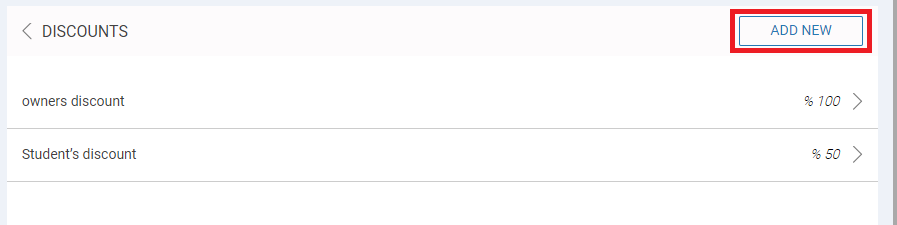
To create a new discounts follow the below mentioned steps.
Step 1.
Click on Discounts.
Step 2.
A list of discounts will be displayed here. Click on ADD NEW.
Step 3.
Enter the discount name.
Step 4.
Select whether discount should be percentage or in rupees.
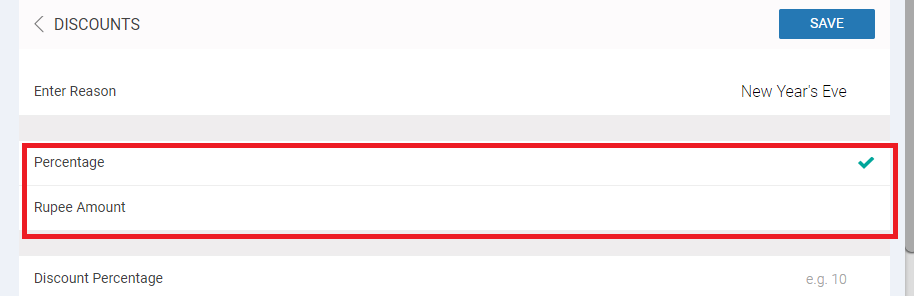
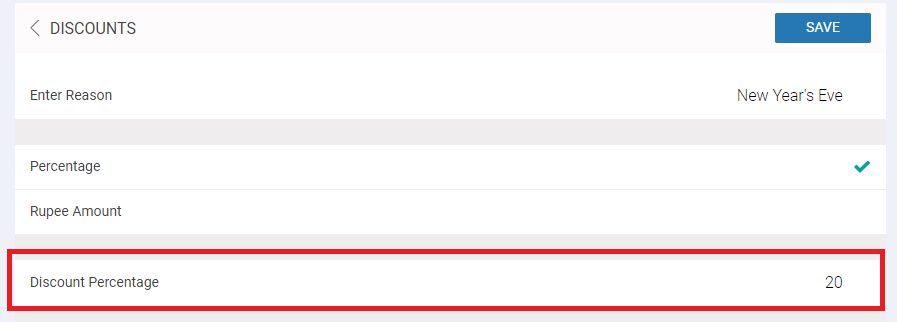
Step 5.
Enter the discount in rupees or percentage.
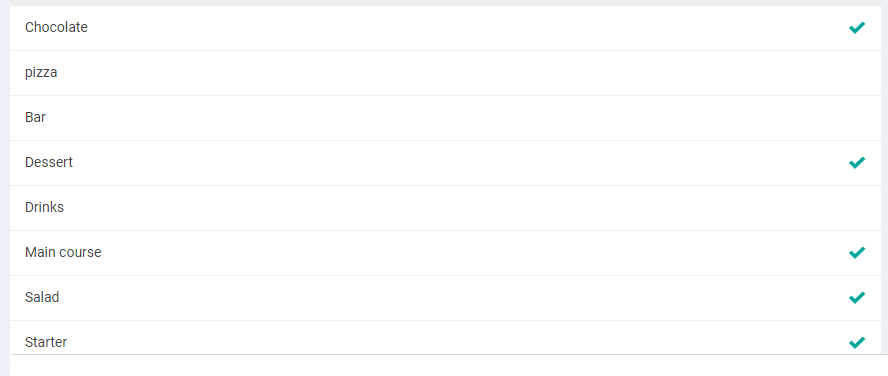
Step 6.
Click on the menu categories you wish to apply this categories on. You can select multiple categories for one discount.
Step 7.
Click Save to proceed.
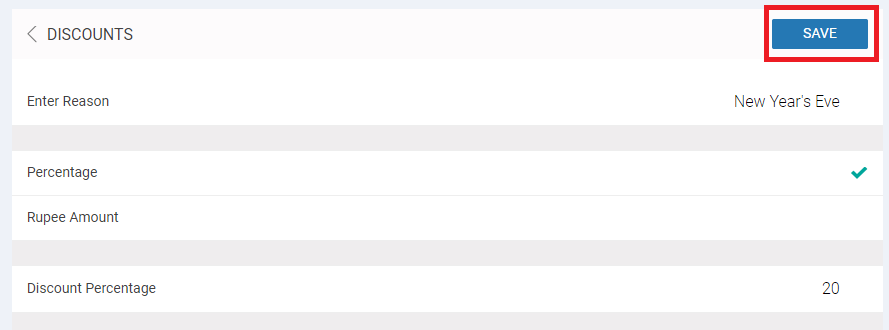
Similarly you can edit all current discounts and save the changes.
7. Promotional Pricing.
This section allows you to add promotional pricing on all your menu items.
To create a new promotional pricing follow the below mentioned steps.
Step 1.
Click on Promotional pricing.
Step 2.
Click on ADD NEW button.

Step 3.
Enter name of the Promotion.
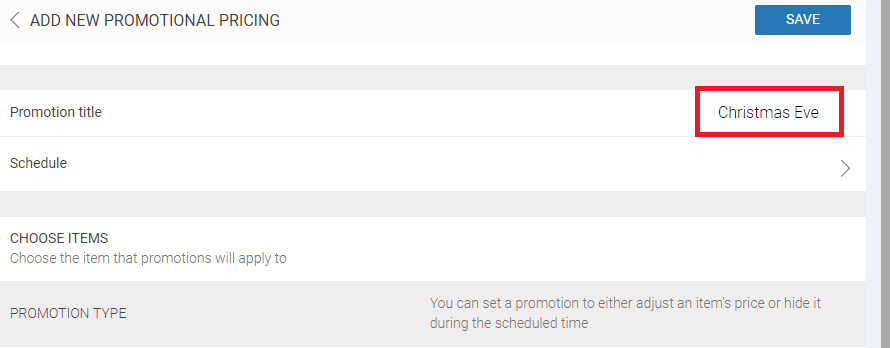
Step 4.
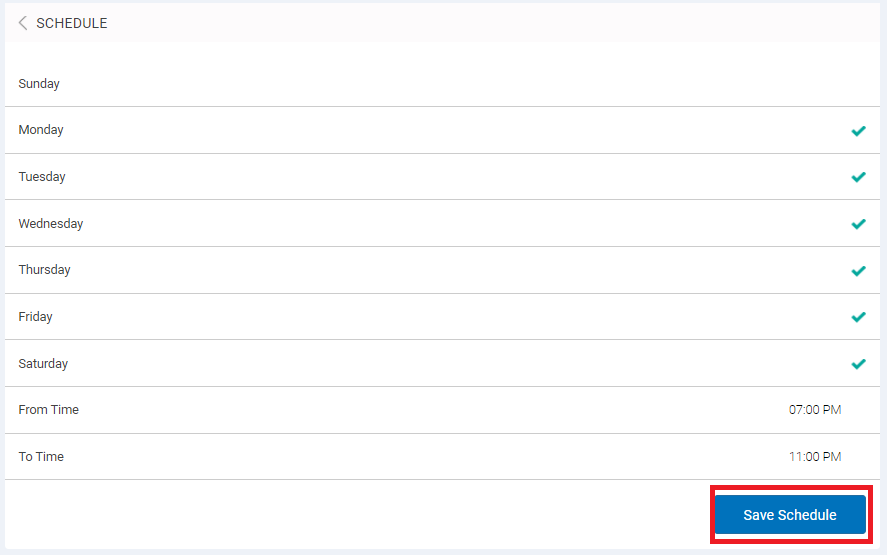
Click on Schedule and select days and set timing of the promotions. Once done click SAVE SCHEDULE.
Step 5.
Click on CHOOSE ITEMS and select the item.
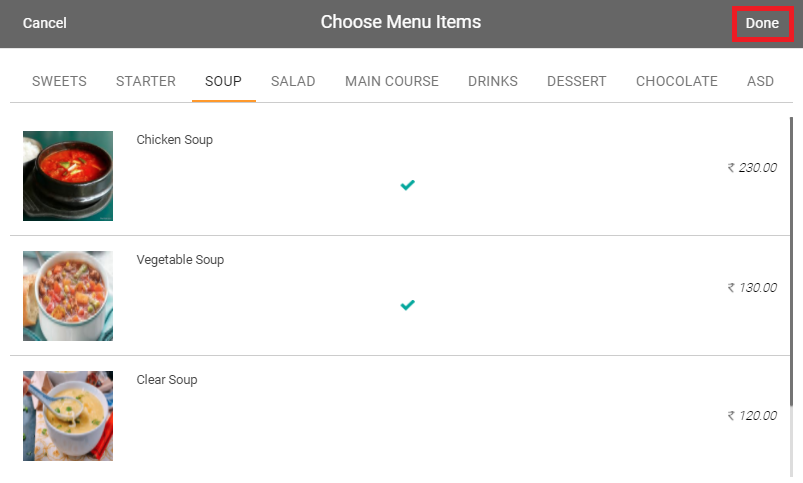
Click on Done.
Step 6.
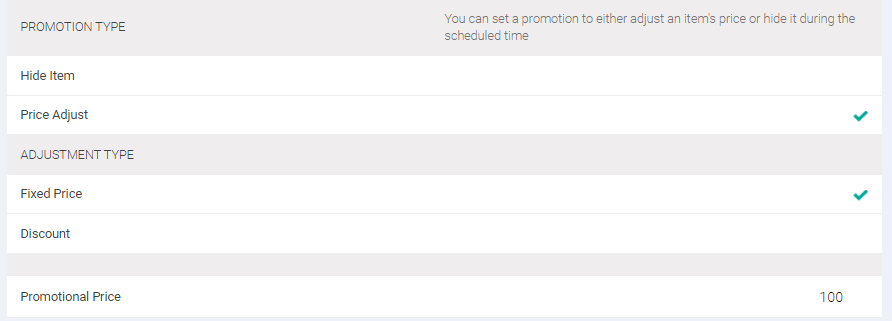
Next decide whether you want to set a promotion to either adjust an item’s price or hide it during the scheduled time.

If you click on Price Adjust, select the adjustment time and promotional prices.
Staff
Staff section allows you to create a staff, manage their roles and records. Additionally you can also customise the roles of your staffs. Clicking on staff member, following 2 options will be displayed.
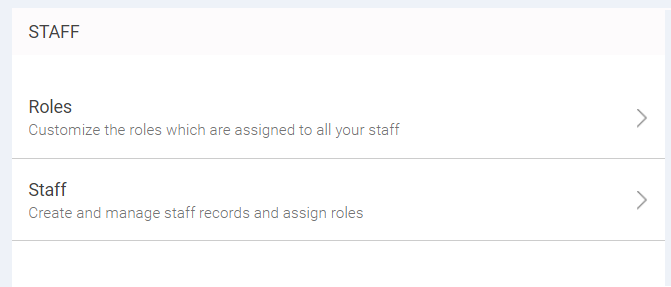
1. Roles: Roles section allows you to customise the roles of your staff in a systematic manner. Here you can assign particular rights to respective staff members to control or handle the assigned module.
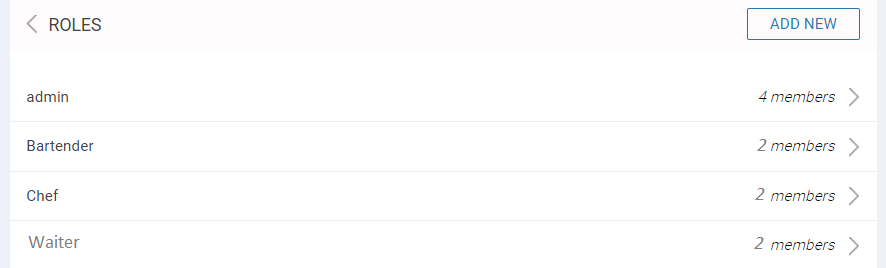
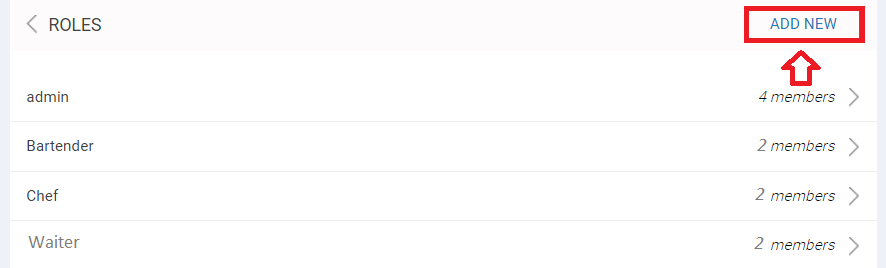
Clicking on Roles option will open list of all roles created by you and number of staff members present in it.
To add a new role click on ADD NEW button as shown below.
On clicking any role, a new screen will open up where you can assign rights and permission to the staff members.
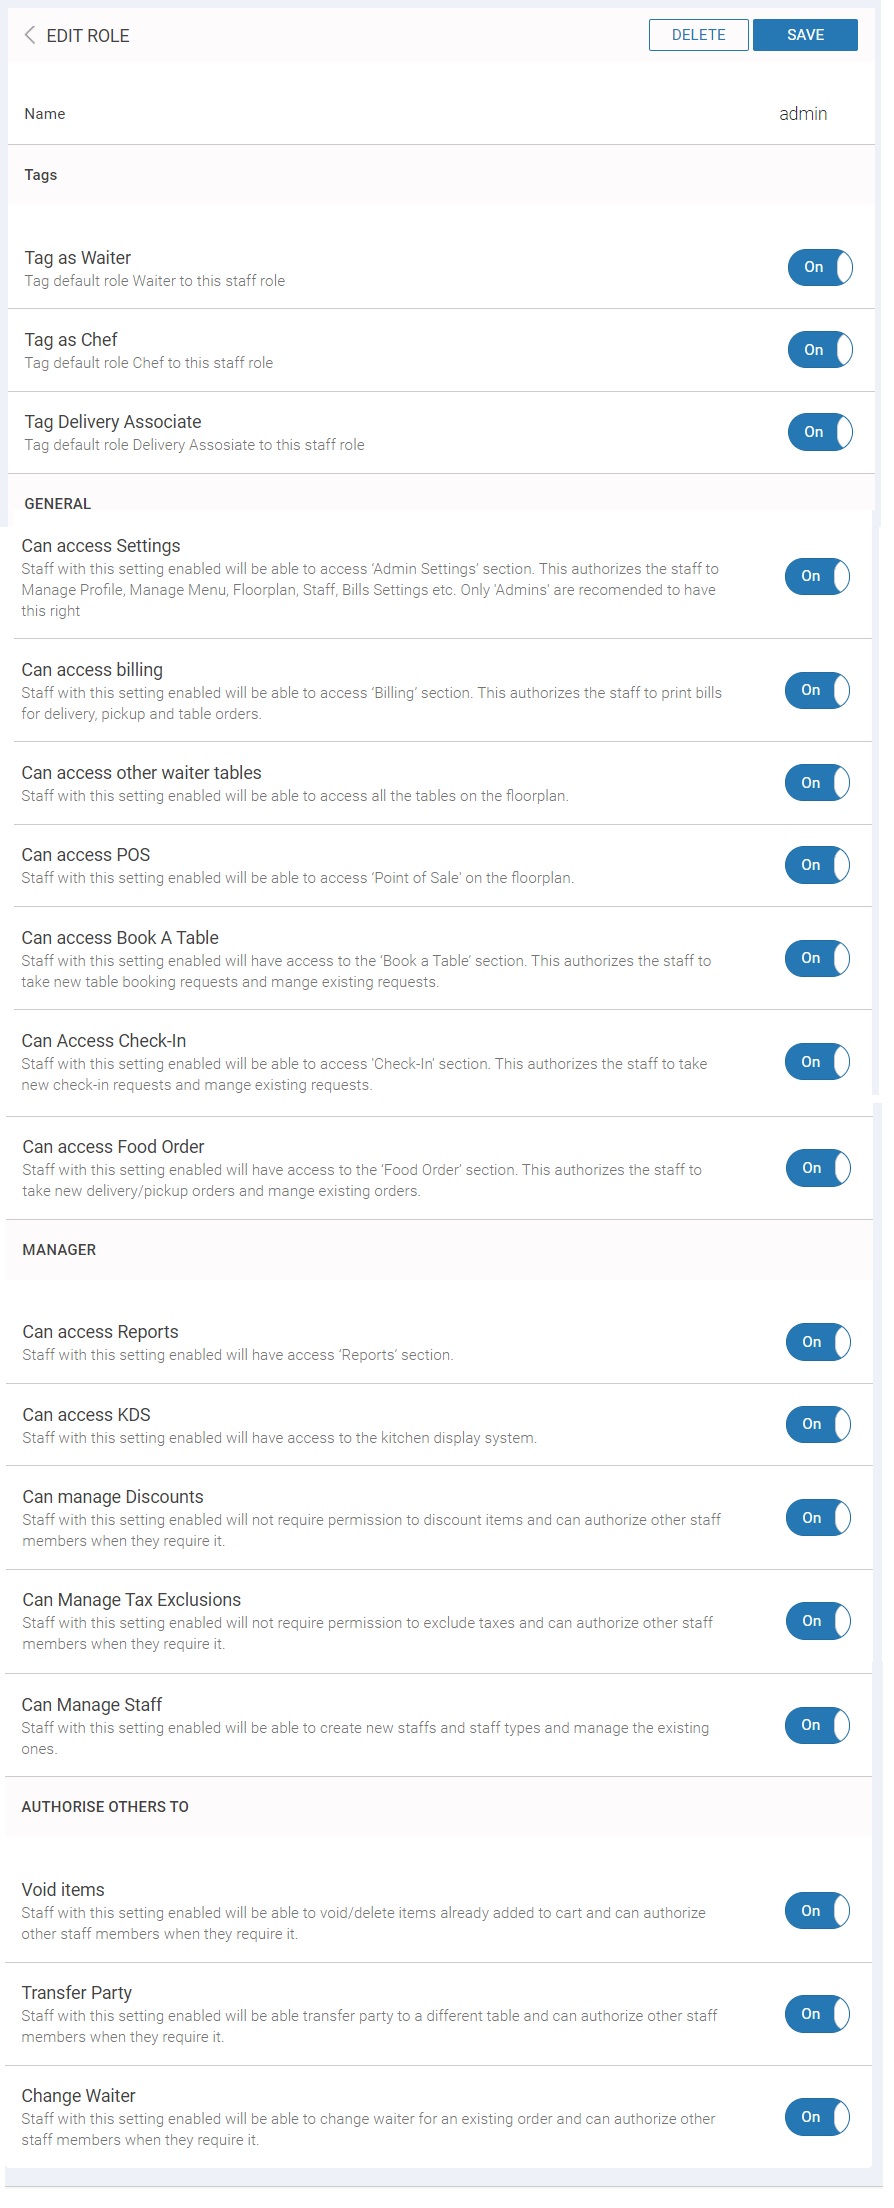
Once done with required changes click on Save button to save all the changes made and proceed.
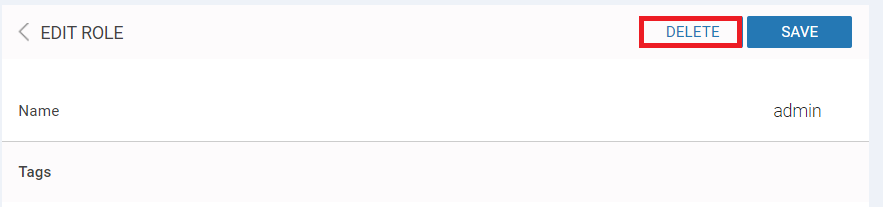
NOTE
In case you wish to delete any role click on the delete option as shown below.
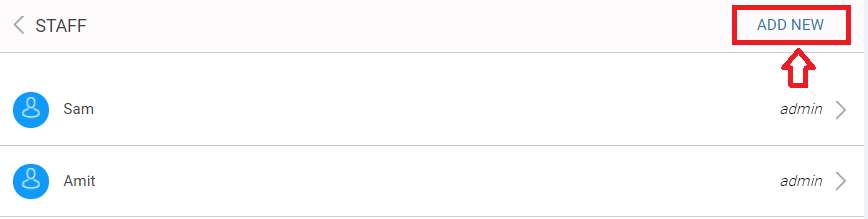
2. Staff: Staff section allows you to create and manage staff records and assign roles to the respective staff.
Clicking on staff options displays complete list of all staff added.
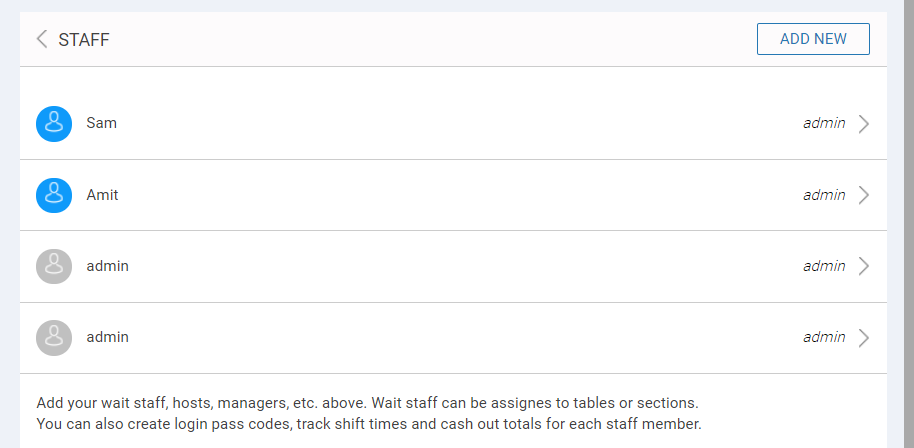
In case you wish to add new staff member, click on ADD NEW button as shown below.
In the next screen that opens up enter the display name of staff, first name, last name, mobile number email address, color for his tables, password and select the role of that staff.

Once done click on Save button to add a staff member.
Similarly you can edit details of any staff member present in the list.
Floor Plans
Floor plan section allows you to create and edit restaurant layout by adding floors, table, walls etc. Additionally you can also assign waiter to any area of restaurant or tables.
Clicking on floor plans section it displays 2 option.
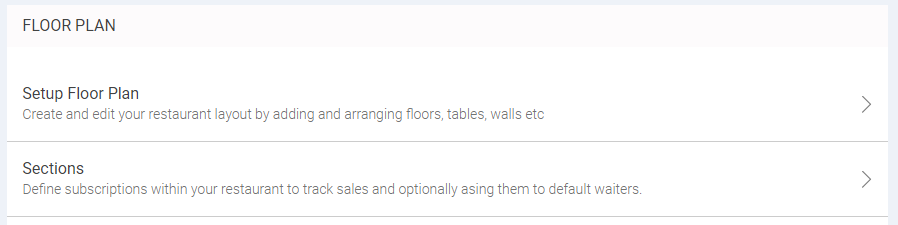
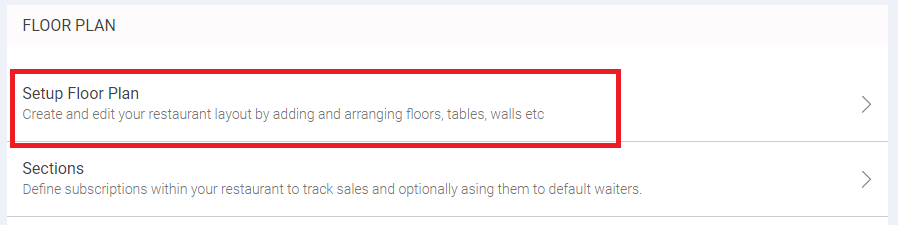
1. Setup Floor Plan
This section allows you to create a new floor or area in the restaurant layout and edit the same by adding floors, tables , wall etc. To setup a new floor or area follow below mentioned steps.
Step 1.
Click on Setup Floor Plan.
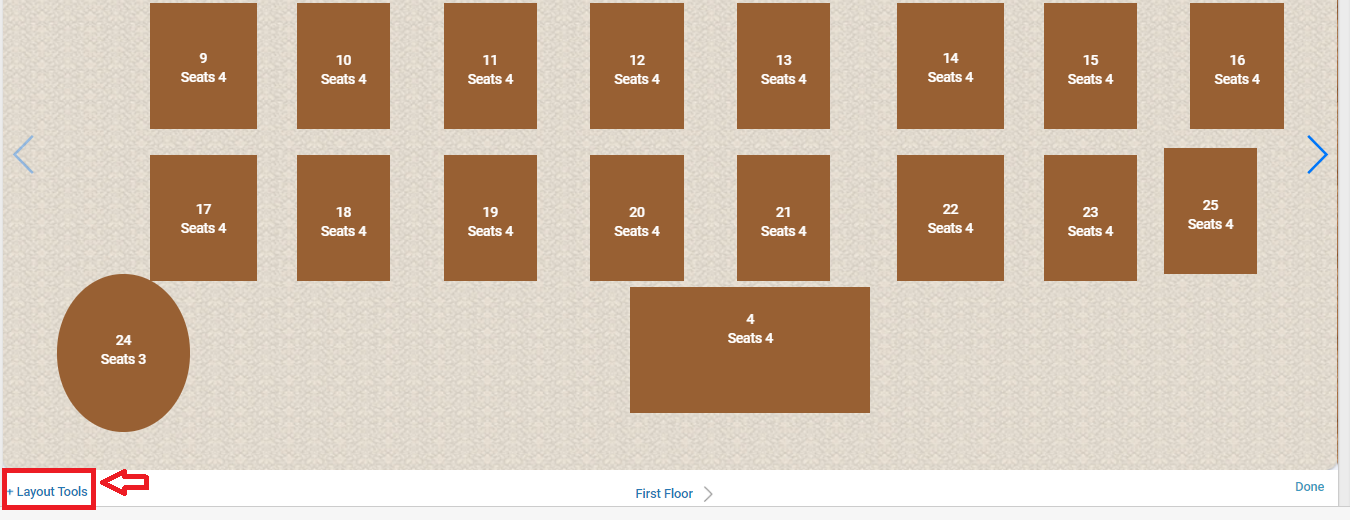
Step 2.
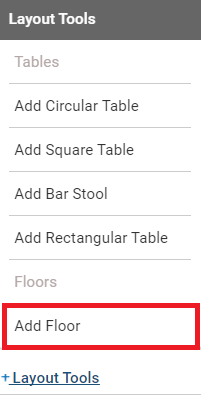
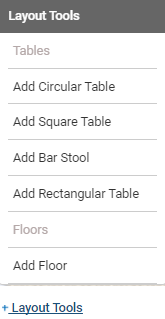
Click on Layout Tools at the left bottom of the screen.
Step 3.
From the option that appears click on Add Floor.
Step 4.
In the next modal that displays, enter floor name, floor level and select the default background image.
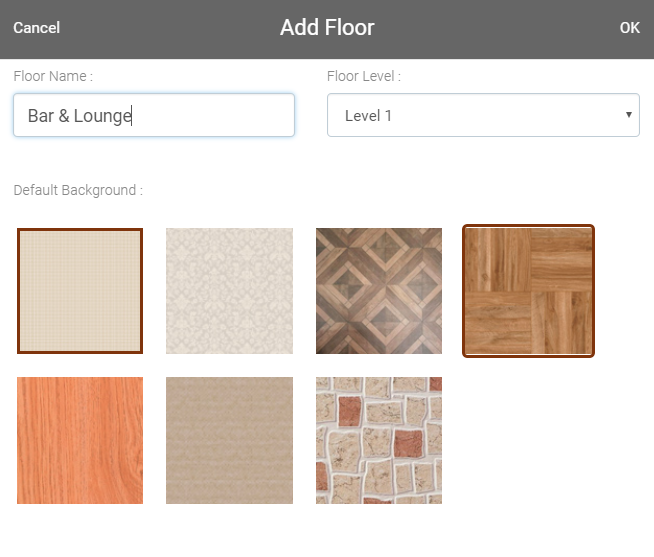
Once done click OK.
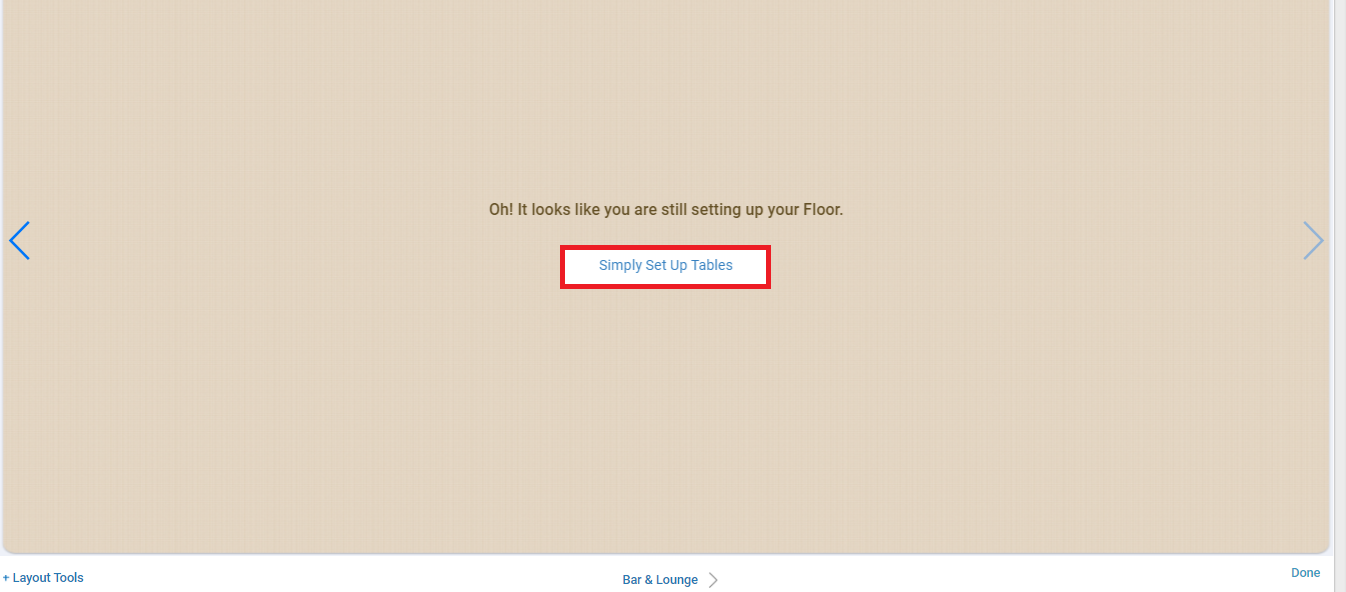
Step 5.
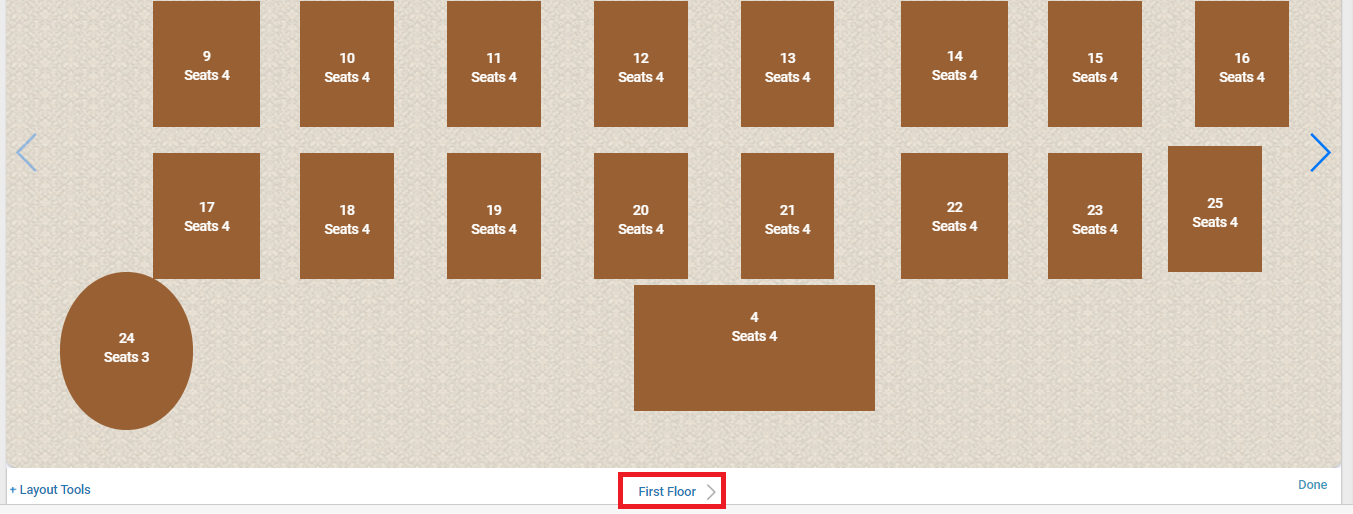
In the next screen that displays click on Simply Setup Tables.
Step 6.
In the next modal that opens up select number of tables you wish to add or manually enter table count.

Click OK to add tables.
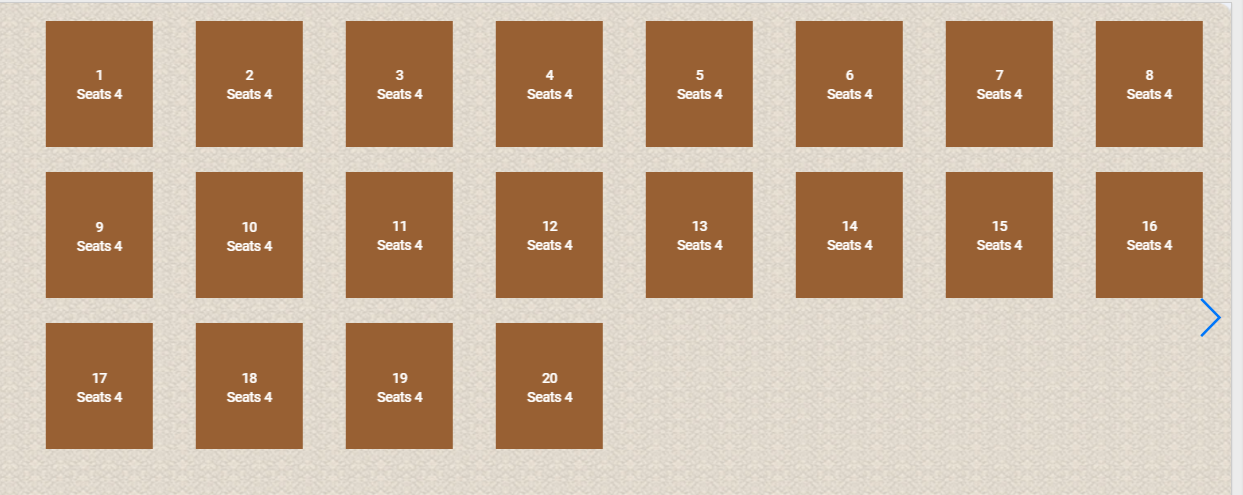
In case you wish to rearrange the tables you can click on it and drag it to the required location. 
You can also add add more number and different type of tables depending on your restaurant layout. Click on the Layout Tools at the left bottom side of the screen and select the type of table your wish to add.
Once done with adding and rearranging tables click Done at the right bottom hand side of the screen.
To edit the name, floor level & background image of any floor click on the floor name as shown below.
Click on the ![]() icon of any floor you wish to edit name, floor level & background image.
icon of any floor you wish to edit name, floor level & background image.
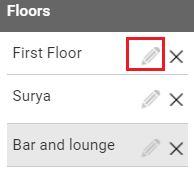
Next edit the required fields and click OK to proceed.
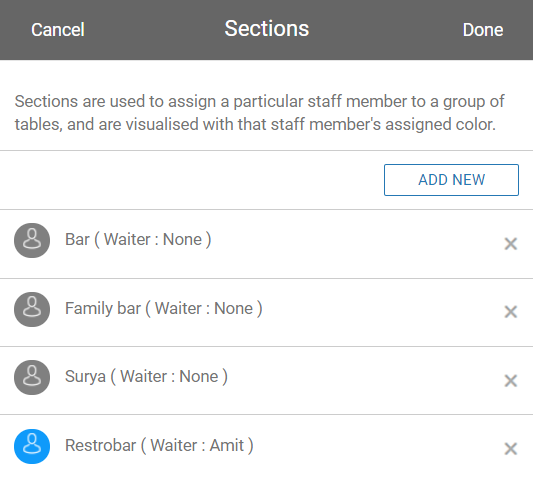
2. Sections
Sections are used to assign a particular staff member to a group of tables, and are visualised with that staff member’s assigned color.
Step 1.
Click on Sections.

Step 2.
It will display list of all restaurant area with staff member and a color assign to them.
Step 3.
To add a new section and assign a staff to that section click on ADD NEW as shown below.
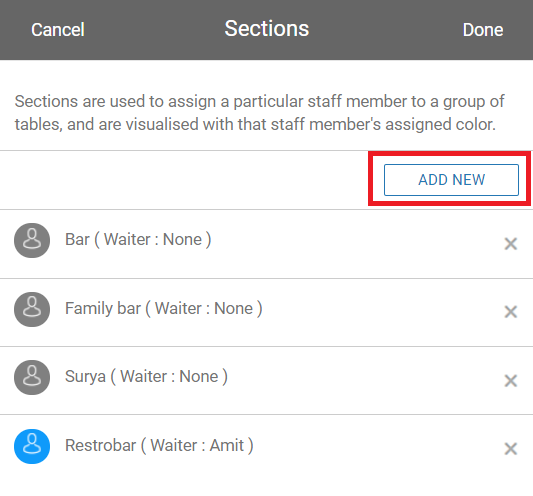
Step 4.
Enter the section name and assign a staff to that section of the restaurant.
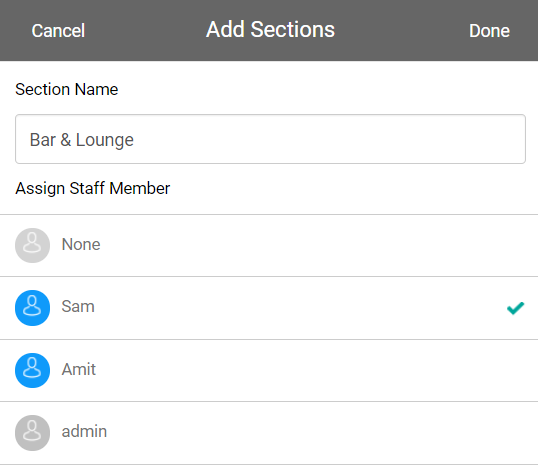
Once done click on Done button to save and proceed.
Printers
The Printers section of Jd Omni allows you setup your computer to work in synchronization with Receipt printers. Once setup, these can be used from your Billing system and other modules, to run your business effectively.
Clicking on the printers option displays the following options.

For better operation we have divided installing and set up process in 2 sections.
1. Windows
2. Linux
Click here to setup printer for Linux & Windows
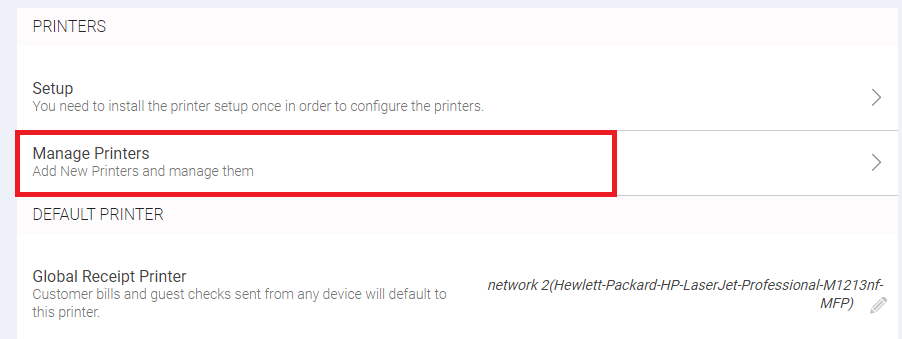
Manage Printers
Manage printers section allows you to add new printers and manage them according your restaurant area and network. To add a new printer follow below mentioned steps.
Step 1.
Click on Manage Printers option.
Step 2.
Click on the ADD NEW option as shown below.
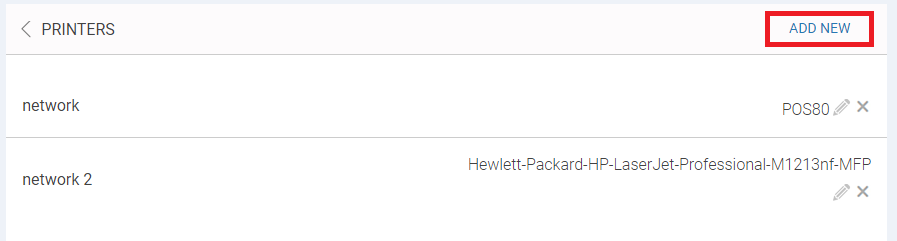
Step 3.
In the next modal that opens up, enter the printer name and click on the printer modal.
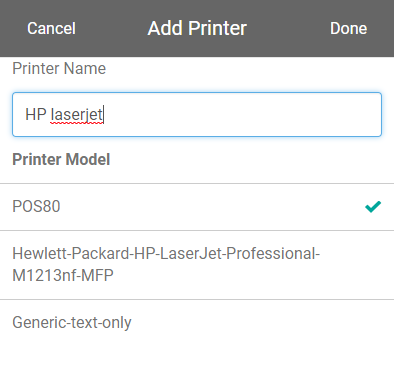
Step 3.
Click Done to add a new printer.
Similarly you can edit details of another printers as well.
Bills & Kitchen Orders
Bills & Kitchen Orders option allows you to customise what customer will see when you print the bill and what information show appear on kitchen chits.
Clicking on Bills & Kitchen Orders displays options to customise Bill/Check Guests, Kitchen Orders and preview of the same.
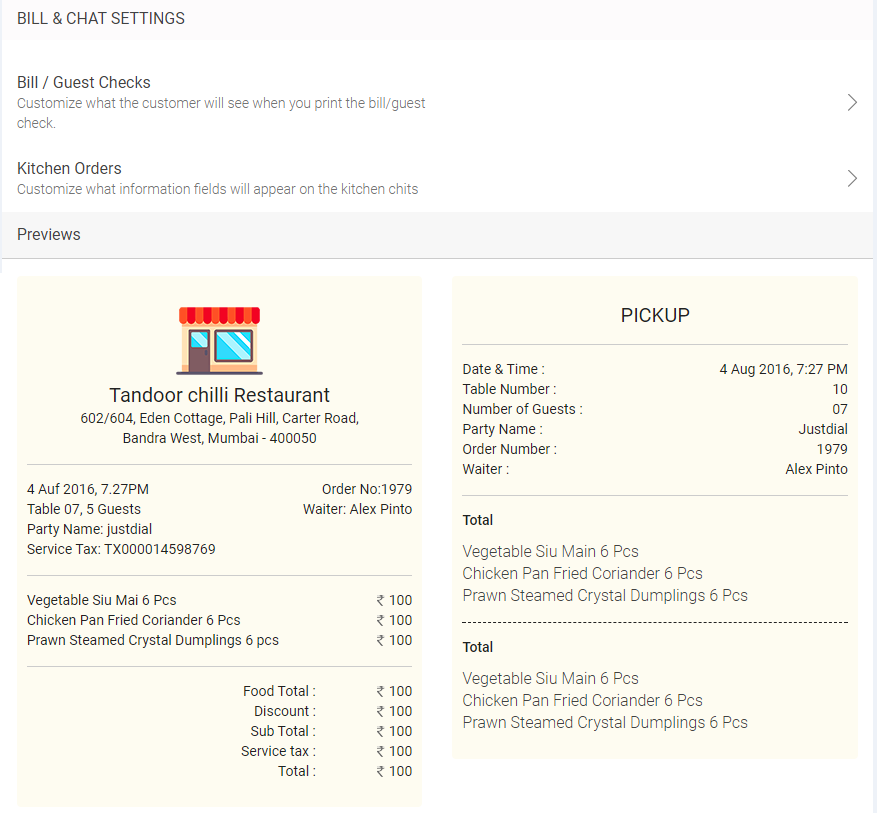
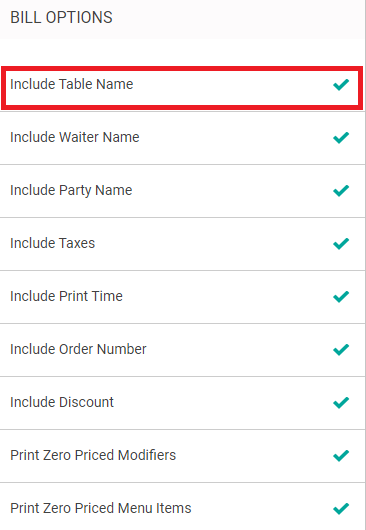
1. Bill/Guest Checks
Bill/Guest checks allows you to customise the details like tables number, waiter name, party name, print time & many other options which should be displayed on the bills.
Clicking on Bill/Guest Checks opens up the below displayed modal.
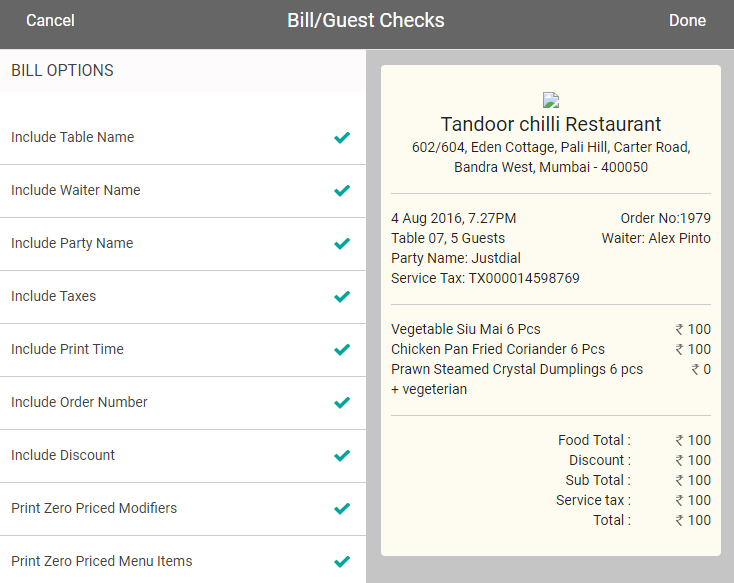
In the bill options list tick on the options you wish to display on the bill. Depending on that options to be displayed on the final bill.
Once done click Done to save and proceed.
2. Kitchen Orders
This section allows you to customise the information that will be displayed on the kitchen chits.
Clicking on Kitchen Orders opens up the below displayed modal.
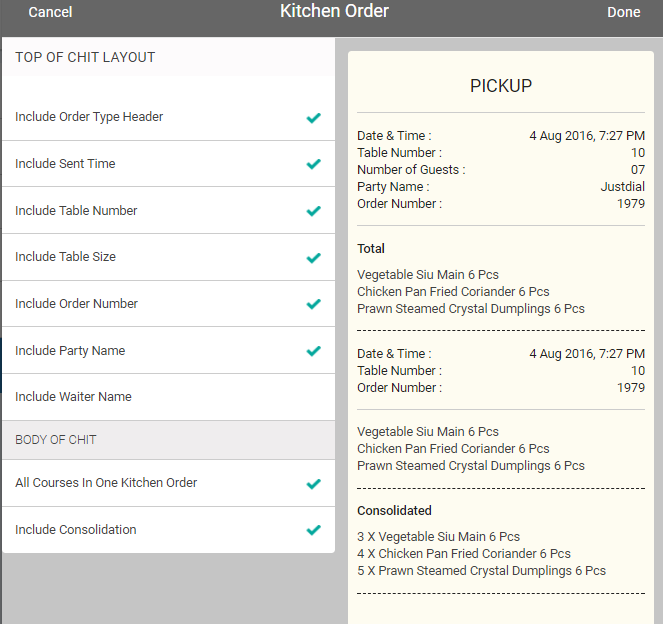
In the Top of Chit Layout list tick on the options you wish to display on the kitchen orders. Depending on that options to be displayed on the kitchen orders.
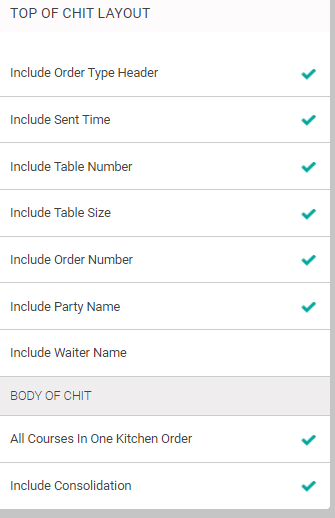
Once done click Done to save and proceed.