Contents
Want to inform your customers about new restaurant openings, or special offers? This section allows you to create campaigns for such promotions. You can also see a list of previously created or partially created campaigns in this section.
To create a new campaign, perform the following steps.
Step 1.
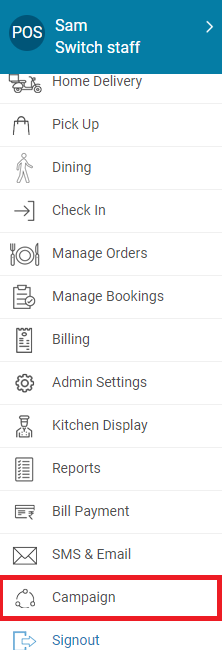
Once you log in to your Jd Omni account, from the main menu click Campaign.
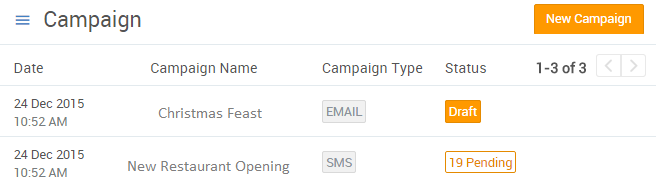
Once on the Campaigns section, all created campaigns can be viewed. Since there are no campaigns created now, the page will look like this:

Step 2.
Click on the New Campaign button in the top-right corner of the page.
We provide you with the following three options to let your customers know about any promotions.
1.1 Creating SMS campaigns
This feature allows sending a brief SMS to your customers regarding the promotion.
Step 1.
Click on the SMS option to campaign through mobile. The SMS Campaign window appears on your screen.

Step 2.
Enter your Campaign Name. This is a mandatory field to go ahead with the campaign creation.

Step 3.
In the Select Campaign Outlets section, you can choose specific outlets where you want to promote your campaign. You can select these from the displayed list of your outlets. In case you want the campaign in all of your outlets, choose the Select All Outlets options.
Step 4.
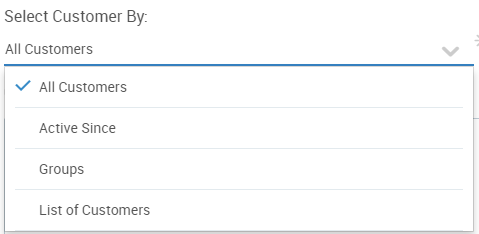
The Select Customer By section allows you to choose a set of customers you want the promotion SMS to reach to.

All Customers – all the customers that are present in the Jd Omni system will be selected and the count will be displayed along with View list button.
Active customer – it will display the options with radio button like 7 days, 30 days, 90 days, 180 days and 365 days.
Groups – it will display all the groups create by you along with the All Group option.
List of Customer – On selecting this option you can select the customer to whom you want to send the SMS.
Step 5.
Create a brief and clear message you want to send to your customers. The message should be such that it attracts the customer to find out more about the campaign. The maximum word limit is 160 characters.
Step 6.
You can send this message to your own number for the trial purpose by clicking the Send button next to your own number.
Note
You can save the created campaign for further use by clicking on the Save as draft button.
Step 7.
Click on Send SMS to send the composed message to the selected customers.
Step 8.
An SMS campaign dialog box appears on the screen for confirmation. Click on the Send button.

The newly created campaign will appear in the Campaigns page.

1.2 Creating App Notification Campaigns
This functionality allows you to send push notifications to all customers using your online store’s mobile app. These notifications can be customized per your requirement.
A push notification that your customer will receive will look something like these:

Step 1.
In the New Campaign modal that opens, click on the App Notifications option.

Step 2.
The App Notification modal opens up as follows:

Enter a name for this campaign in the Campaign Name field. This name will not be visible to your customers but will be useful for your campaign management.
Step 3.
In the Notification Title field, enter the heading of the notification that will be displayed to the customer.
1.3 Creating Email campaigns
This feature allows to send a detailed email to your customers regarding the promotion.
Step 1.
Click on the Email option to campaign through emails.The Email Campaign window appears on your screen.

Step 2.
Enter your Campaign Name. This is a mandatory field to go ahead with the campaign creation. The name will also help you later for recording purposes.

Step 3.
In the Select Campaign Outlets section, you can choose specific outlets where you want to promote your campaign. You can select these from the displayed list of your outlets. In case you want the campaign in all of your outlets, choose the Select All Outlets options.
Step 4.
The Select Customers By section allows you to choose a set of customers you want the promotion Email to reach to.
All Customers – all the customers that are present in the Jd Omni system will be selected and the count will be displayed along with View list button.
Active customer – it will display the options with radio button like 7 days, 30 days, 90 days, 180 days and 365 days.
Groups – it will display all the groups create by you along with the All Group option.
List of Customer – On selecting this option you can select the customer to whom you want to send the SMS.
Step 5.
You can enter any details you wish the customer to see as the sender, in the From option. It can either be your name, your store name, your email ID, or any other details you wish to.
Step 6.
In the Email Subject field, enter the heading for the email.
Step 7.
Create a detailed and clear email you want to send to your customers.The message should be such that it attracts the customer to find out more about the campaign.
Step 8.
To send a trial email to yourself, enter your email Id and click on the Send button.
Note
You can save the created campaign for further use by clicking on the Save as draft button.
Step 9.
Click on Send Email to send your email to your customers.
Step 10.
An Email Campaign dialog box appears on the screen for confirmation. Click on the Send button.

The newly created campaign will appear in the Campaigns page.